Multiple Event Registration Add-on
The Multiple Event Registration add-on adds a shopping cart feature on your site. It will allow your attendees/registrants to purchase or register for multiple events with only one checkout process needed!
View quick links for this add-on –>
Need to Buy a Support License for the Multiple Event Registration Add-on?
https://eventespresso.com/product/espresso-multiple/
Installation
This add-on is a plugin for WordPress and can be installed through your WP dashboard (WP-admin).
Download the latest version of the Multiple Event Registration add-on from your Event Espresso account.
Then login to your WordPress dashboard (WP-admin) and go to Plugins. Next, click on Add New –> Upload and browse to the plugin on your computer. Then select the zip file and begin the upload process. Wait for the plugin to upload and then click on Activate.
Setup and Configuration
You will not see any new WordPress administration menus for the add-on.
Usage
The Multiple Event Registration add-on will create a shopping cart experience on your site. Your registrants/attendees will be able to add several events to a shopping cart and then complete registration checkout once (instead of once per event).
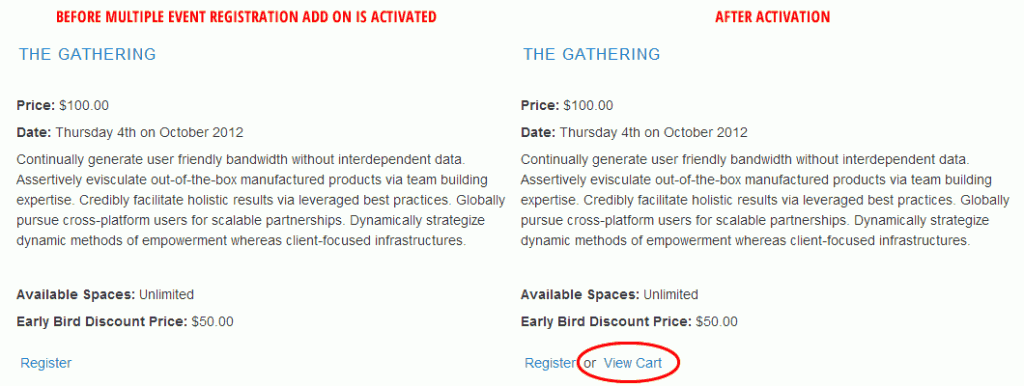
The events on the event listing page will receive an add to cart link as shown in the image above.
Registration Checkout Workflow
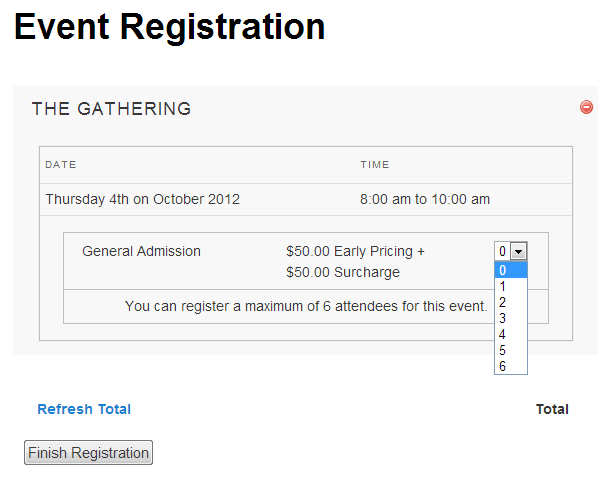
After adding an item to the cart, your attendees/registrants will be shown the View Cart link on any event in the list that they have added. Clicking the View Cart link link will then take them to the cart confirmation page where they can select the number of tickets / pricing options they want, remove events they no longer want, and proceed to registration checkout.
The stop sign (red icon) in the top right corner of each event will remove the event from the shopping cart when clicked.

You may notice here that the customer can select multiple amounts of the same type of ticket! This is determined by the Max Group Registrants number in the individual events, so in the case above its set to 6.
This can be used to your advantage – by setting numerous pricing options in an event, your customers can buy various ticket types in varying numbers, allowing a greater degree of flexibility for you.
Need to collect information from all attendees/registrants? Go to WP-admin –> Event Espresso –> Event Overview. Now locate your event and click on it and you’ll be brought to the event editor. Towards the right area of the screen, you’ll see the Event Options widget. Look for the option for Additional Attendee Registration Info and set it to Full registration information. Then save changes to your event.
Using the MER Add-on with Single Event Pages
By default the Multiple Events Registration add-on will not affect single event pages. If you enable the add-on and browse to a single event page, then you’ll still see the registration form. You can change an event to use the shopping cart from the add-on in a few steps.
1) Login to your WordPress dashboard. Then go to Event Espresso –> Events Overview. Locate your event in the list and click on it.
2) You’ll now be viewing the event editor. Towards the right side of the page, you see an area for Event Options. Locate the Display registration form option and set it to No.
3) Add the shortcode below to the end of the event description area.
[ESPRESSO_CART_LINK]
Here is an alternative shortcode that will immediately take a registrant/attendee to the cart after they click on the link:
[ESPRESSO_CART_LINK anchor='Register for this Event' direct_to_cart=1 moving_to_cart='Redirecting to cart...']
4) Then save changes to your event.
Examples of Add to Cart Shortcodes
Most of the following shortcodes can be used on a WordPress page or post. Some shortcodes can only be used in the event description area.
- Default shortcode; can only be used in the event description area
[ESPRESSO_CART_LINK] - Create a Register link that will redirect to the shopping cart after being clicked; can only be used in the event description area
[ESPRESSO_CART_LINK direct_to_cart=1 moving_to_cart='Redirecting to cart...] - Create a Register for this Event link that will add an event with an ID of 1 to the shopping cart
[ESPRESSO_CART_LINK event_id=1 anchor='Register for this Event'] - Create a link that will add multiple events to the shopping cart; Link text will say “Register for this Event”
[ESPRESSO_CART_LINK event_id=1 anchor='Register for this Event'] - Create a Register link for an event with an ID of 123 that will redirect to the shopping cart after being clicked
[ESPRESSO_CART_LINK event_id=123 direct_to_cart=1 moving_to_cart='Redirecting to cart...']
Add to Cart Shortcode Parameters
anchor='text for link' (Specify the text for the add to cart link; default is Register)
event_id=1-2-3 (Specify the numeric IDs of the event(s) that should be added (e.g. 1-2-3 will add an event with an ID of 1, an event with an ID of 2, and an event with an ID of 3).
direct-to-cart=1 (Set to 1 to redirect an attendee/registrant to the shopping cart after they click the link)
moving_to_cart='text for message' (Specify the text that should be shown when the redirect to shopping cart begins)
Troubleshooting
The plugin will not activate. Can you help?
Are you running a current version of Event Espresso 3?
Where is the menu screen for this add-on?
This plugin does not create any new menus in the WordPress admin screen. It can be used by adding a shortcode to a WordPress post or post. Please see the documentation in the usage section on this page.
I’m seeing a warning above my event pages.
Ensure that your Event Espresso software including core plugin and all add-ons are up to date. Then turn off WordPress debugging by changing a macro in your wp-config.php file.
Customizations
- None at this time. Check back soon!
https://eventespresso.com/product/espresso-multiple/

