A Skydiving Business
 This use case is based on creating a Sky Diving club, focused on providing new and experienced jumpers the experience of throwing themselves out of a plane from thousands of feet up with nothing but a fancy table cloth strapped to their backs!
The use case will guide you through the steps of setting up a basic site based around sky diving: from setting up the information we will need, changing appropriate settings right through to creating tickets and events. The details outlined here are bare bones, designed to be used as a spring board for a site, and can quite easily be used for many other event types.
Before We Start
To start with we will need to outline exactly how we are going to layout the events for this site. This will make it easier further down the line and can be referred back to.
Skydiving clubs requirements
- This skydiving club offers two types of jumps Single and Tandem. Single is only available to logged in members as they need to confirm their jump credentials. Tandem is available to the public.
- They offer two locations for both types of jumps.
- Each event will only be able to accommodate 5 people (excluding instructors, pilots etc)
- Each attendee will be given an E-ticket.
- If a group books the full 5 places in one go they will get a substantial discount.
To fulfill these requirements, we will need certain plugins:
- Event Espresso Version 3 – the core plugin.
- WP User Integration – to enable member only events.
- Volume Discount – to provide bulk discounts.
- Ticketing – to create printable and e-tickets.
These are all available via the Business Licence.
Basic Settings
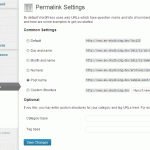
I will assume already you have WordPress installed. Head over to the WordPress Settings menu item, and in the General section change the timezone to match your location (by closest city, not UTC time) and then in the Permalinks section change the links to Postname (this isn’t required but helps with SEO and looks a lot better too).
Go to Plugins > Add New and install the Event Espresso core plugin and the add ons and activate them.
Go to Event Espresso General Settings, check the Organization settings and fill out the basics and hit the save options button.
Preparation
In order to make sure we have everything ready for when we start to create events, we will need to prepare all the aspects of the plugin, venues, tickets, questions, etc.
Venues
As the skydiving club offers two locations we will need to create them. Go to Venue Manager and add a new venue and fill out the details. Do this as many times as you need, we will create two in this example.
Now that we have our two locations we can move on.
Categories
We will set up a single category for now so that we can apply a discount to it. It is easier to set up a category now than try to retro actively do it when you have many events, plus you can use the categories in other ways, such as separating the events into category based listings.
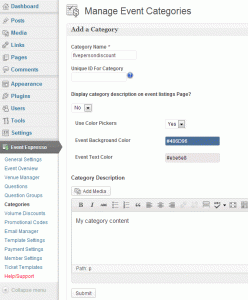
Click the Category menu and Add new category. All we will add here is the Category name. For the example it will be fivepersondiscount.
Discounts
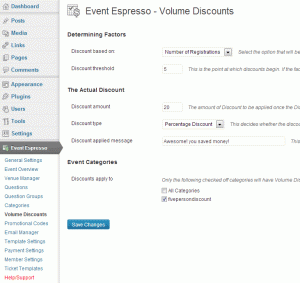
Click the Volume Discount menu and enter some discounts. For this example we will use the following:
- Discount based on: Number of Registrations
- Discount Threshold: 5 (the max. number of jumpers)
- Discount amount: 20
- Discount Type: Percentage
- Discount Applied Message: Awesome! You saved money!
- Discounts apply to: fiverpersondiscount
Questions
We will need to get some extra information beyond the basic name and address for each jumper. In this case it will be for things like illnesses and conditions, jump experience and confirming their acceptance of the terms.
The questions I created were
- Do you have any known illnesses or medical conditions?
- Required. Yes or No answer via dropdown.
- Please list illnesses/conditions if appropriate.
- Not required. Text area for an open ended answer.
- What is your jump experience?
- Required. Radio buttons with various choices.
- Do you hold a jump permit?
- Required. Yes or No answer via dropdown.
- Permit number if applicable.
- Not required. Text field.
- Do you agree to the Terms and Conditions?
- Required. Single checkbox.
Once these are done we will group them in a Question Group allowing us to add them to an event. Go to Questions Groups, Add New Group and then give the group a name (Jump Questions in this example) and select the questions we just made and click the Add Group button.
If you mess up with the order of your questions, don’t fear, you can simply drag and drop the order in the Questions menu or by editing the questions you can set a manual numerical order, where 0 (zero) will come at the top.
Ticket
Let’s create a ticket template that we can use for these events and others beyond that.
Make sure you have the Ticket add on activated and then go to the Ticket Templates menu item. For the moment we will only create a basic ticket, nothing too fancy.
Give the ticket a name and add your logo if you have one, add a few details into the ticket description. These can always be edited later.
Payment Settings
Last thing to set up before we tackle the events themselves, Payment!
In this example we will just use PayPal but you could easily set up with any other payment method from the 25+ gateways we have.
The Events!
OK, so now that all the admin type stuff is done we will concentrate on getting the events created. First off lets have a think about how we want the events structured.
The Tandem jumps and Solo jumps will be provided as separate events, enabling the crew to cater for inexperienced customers and experienced customers who may wish to go higher, separately.
We also need to create the events separately for the 2 venues.
So for now we will create 4 events.
Firstly the Beginner Tandem events. Go to the Event Overview and Add Event.
Add a title and description. Registration dates will start a month or so before the event allowing time for people to sign up, but you can make this as long or as short as necessary. The event is a one day affair so the event start date and end date will be the same. Don’t worry about the registration times, leave those blank, but the event times need to be filled out so the customers know when to show up and when they can expect to start their way home.
We only need one pricing option here, but to make sure that any logged in members don’t get the jump for free, make sure you fill out the member price to the same as the standard price.
We will add a $20 surcharge here to cover the costs of insurance (per head).
Select the appropriate venue, in this first one it will be Jake Garn Airport.
We have no need to use a custom email or create a post so we can skip those.
In the right hand options, we need to fill out some information:
- Attendee limit: 5 – the max people we will allow on the event.
- Allow group registrations: Yes – we need this to use the volume discount we set up earlier.
- Max Group Registrants: 5
- Additional Attendee Registration Info?: Full registration information – we need all their details and question answers.
Skipping down a bit we need to make sure we have our ticket selected.
This isn’t a Member only event so we can leave that for now and make sure the Event Category is selected ( fivepersondiscount in this example) so that we can use the volume discount.
Lastly make sure that the Address Information and Jump Questions are selected for both the Primary and Additional Attendees.
Once these are done, click Submit New Event (top right corner of the page).
Ok, onto the next. Rather than type everything out again, we will edit the first event by clicking its name in the Event Overview, and click Duplicate Event in the top right corner.
On the Event Overview you will now see two events. Click the one with the higher ID number (2 in this case) to edit it so we can change the details a bit.
The only things that got changed were the Title (to help differentiate it in the list) and the location to the second venue. You could of course change the description, dates, times, prices etc.
Once done, click Update Event.
Now to create the Solo Jump events.
You can again duplicate an event or feel free to start another from scratch.
What about having to manually create these multiple events of the same details throughout the year? We have that covered too, with the Recurring Events Manager add on.
The main differences with these events is that we will select the option on the right Member only event and mark it Yes. This will limit the events to registered and logged in members. We will also turn off the group registration for these as we need to make sure they are all members.
If you need to go back the the questions and question groups to create a new set of questions solely for the solo jumpers, you can even reuse some of the questions made earlier in the new question group. For this example we will just keep the same ones.
So now we have 4 events, 2 open to the public and 2 only available to members.
But how does someone become a member? Well that requires a third party membership/registration program such as S2member or the use of the built in WordPress registration system (http://www.yoursite.com/wp-login.php?action=register)
And this is what the registration page would look like (in Twentyeleven theme, no additional styling).
What if you wanted people to be able to book more than one jump in one purchase? By using the Multiple Event Registration add-on, you can have the flexibility of an add to cart system.
But what about the ticket that the client will receive Well we did only create a basic ticket with the default settings, so you can create all sorts of wonderful ticket designs. Here is what our basic ticket looks like, a bit plain, but serviceable.


