Add a Sponsors Section to Events Using Advanced Custom Fields
Requires Event Espresso 4.8 and above.
In this tutorial, we will create an event sponsor section that can be displayed throughout the event details, ticket selector page, and checkout process.
To keep this example short and to the point, I will show you how to add a single sponsor to a an event. Developers that are familiar with the ACF plugin should be able to use the “ Repeater Field” and/or the “Flexible Content Field” add-ons for ACF to to create an infinite amount of sponsors for each event.
 Add a New ACF Field Group for Sponsor Details
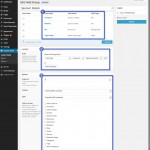
- Create a new ACF Field Group (WP Admin > Custom Fields > Add New) [screenshot]
- Add the following fields to the group:
- Company (sponsor_company | Text)
- Website (sponsor_website | Text)
- Bio (sponsor_bio | Wysiwyg Editor)
- Logo/Image (sponsor_logo_image | Image) – Note: Set the Return Value to ‘Image URL’
- Set the “Show this field group if ” setting to “Post Type > is equal to > Event”.
- [optional] Change the order, position, and style of the meta box in the EE4 event editor.
Add a Custom Hook
Next we need to add the code that will output the sponsor details. There are actually two options, which I will outline below:
- Option 1: Child Theme
Add the following code to the functions.php file in a child theme. For more information about child themes, checkout the WordPress Child Theme Documentation. - Option 2: Site Specific Plugin
[Recommended] Create a site specific plugin using the code below. For more information about site specific plugins, check out our documentation on the subject.
function ee_event_sponsor_area() {
    ?>
    <div class="sponsordetails">
    <h3><span class="dashicons  dashicons-heart "></span>Event Sponsor</h3>

    <h4><img align="right" src="<?php the_field( "sponsor_logo_image" )?>"><strong><a href="<?php the_field( "sponsor_website" )?>"><?php the_field( "sponsor_company" )?></a></strong></h4>
    <?php the_field( "sponsor_bio" )?>
    </div>
    <?php
}
add_action( 'AHEE_event_details_after_the_content', 'ee_event_sponsor_area' );
The snippet above uses an EE4 action hook called “AHEE_event_details_after_the_content” to display the contents of the “ee_event_sponsor_area()” function, which contains the HTML for our new sponsor box. The hook can be found within the wp-content/plugins/event-espresso-core/shortcodes/espresso_thank_you/templates/thank-you-page-registration-details.template.php file.
Create a New Event & Add a Sponsor
- Create a new Event Espresso event (WP Admin > Event Espresso > Events > Add New Event)
- In the new meta box generated by ACF using the steps outlined above, add the sponsor details to the event. [screenshot]
- Publish the event.
View the Event on the Front-end
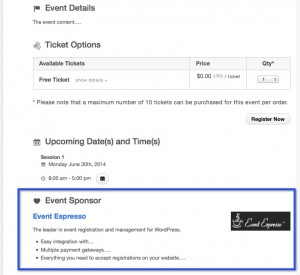
You should end up with something like this in the event details:
Adding the sponsors section to the SPCO
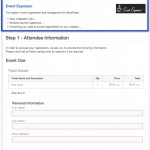
 Want to add the sponsors section to the “Single Page Checkout” (the EE4 registration process, also known as SPCO)? This is where it gets a little tricky, because we have to grab the event post ID from the transaction object.
Open your theme/functions.php file and add the following code snippet:
<?php
//* Please do NOT include the opening php tag, except of course if you're starting with a blank file
add_action( 'AHEE__attendee_information__reg_step_start', 'ee_reg_steps_area' );

function ee_reg_steps_area() {
    $checkout = EE_Registry::instance()->SSN->checkout();
    if ( $checkout instanceof EE_Checkout ) {
        $transaction = $checkout->transaction;
        if ( $transaction instanceof EE_Transaction ) {
            $registrations = $transaction->registrations();
            $registration = reset( $registrations );
            if ( $registration instanceof EE_Registration ) {
                $event = $registration->event();
                if ( $event instanceof EE_Event ) {
                    ?>
                    <div class="sponsordetails">
                    <h3><span class="dashicons dashicons-heart"></span>Event Sponsor</h3>
                    <h4><img align="right" src="<?php the_field( 'sponsor_logo_image', $event->ID() ); ?>">
                        <strong><a href="<?php the_field( 'sponsor_website', $event->ID() ); ?>">
                            <?php the_field( 'sponsor_company', $event->ID() ); ?>
                        </a></strong>
                    </h4>
                    <?php the_field( 'sponsor_bio', $event->ID() ); ?>
                    </div>
                    <?php
                }
            }
        }
    }
}
Visit the row on Git: https://gist.github.com/joshfeck/978e59dfe92272047f549119097733c1#file-sponsors-php
Since the default styles in EE4 push down the “Step 1” heading, you may need to reduce the amount of space between the step heading and the sponsor details [ screenshot]. To decrease the space between the step title heading and the sponsors box. You will need to add the following CSS to your theme/functions.php file.
.ui-widget .spco-step-title-hdr { margin-top:1em !important; }
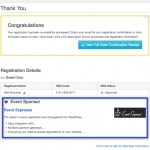
Adding the sponsors section to the “Thank You” page
 Adding the the sponsors section to the “Thank You” page is similar to the SPCO. We just need to grab the event post ID from the “$registration” variable, which is passed to the EE4 action hook “AHEE__thank_you_page_registration_details_template__after_registration_table_row”. The hook can be found within the wp-content/plugins/event-espresso-core/shortcodes/espresso_thank_you/templates/thank-you-page-registration-details.template.php file.
function ee_sponsor_area_thank_you_page($registration) {
    if ( $registration->attendee() instanceof EE_Attendee ) {
    ?>
        <tr>
            <td colspan="3">
                <div class="sponsordetails">
                <h3><span class="dashicons  dashicons-heart"></span>Event Sponsor</h3>

                <h4><img align="right" src="<?php the_field( "sponsor_logo_image", $registration->event()->ID() )?>"><strong><a href="<?php the_field( "sponsor_website", $registration->event()->ID() )?>"><?php the_field( "sponsor_company", $registration->event()->ID() )?></a></strong></h4>
                <?php the_field( "sponsor_bio", $registration->event()->ID() )?>
                </div>
            </td>
        </tr>
        <?php
    }
}
add_action( 'AHEE__thank_you_page_registration_details_template__after_registration_table_row', 'ee_sponsor_area_thank_you_page', 10, 1 );
Finishing up the sponsors section
That basically covers adding a sponsors section to a single event, the registration process, and the thank you page. You may, or may not, want to add the sponsors section to each of these places, but the examples are there. If you find that you want to add additional sponsors to each event, you may want to look into using the “ Repeater Field” and “Flexible Content Field” add-ons for the Advanced Custom Fields plugin to to create an infinite amount of sponsors for each event.
Related Articles
Adding Related Events Using Advanced Custom Fields
Add a Course Curriculum Section to the “Thank You” Page Using Advanced Custom Fields

