Invoice Payment Method
The Invoice payment method will allow your attendees/registrants to pay for their event registration via an invoice.
View quick links for this payment gateway –>
Need to Buy a Support License for Event Espresso 4?
https://eventespresso.com/pricing/?ee_ver=ee4
Installation
No installation is required. The Invoice payment method is included with the Event Espresso 4 core plugin.
Setup and Configuration
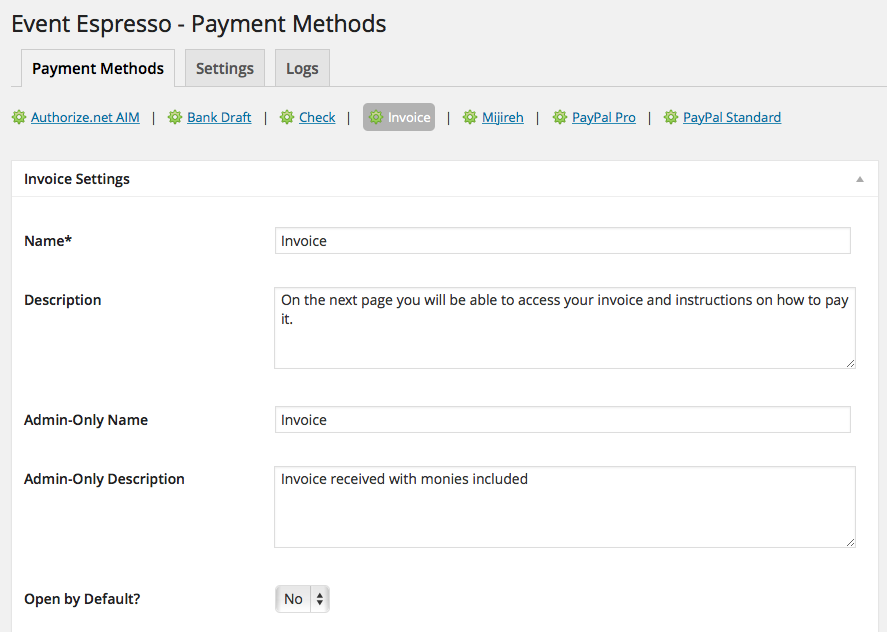
Login to your WP-admin (WP Dashboard) and go to Event Espresso –> General Settings –> Payment Methods. Once on the Payment Methods screen, click on Invoice and click on the button to activate the payment method.

Below are the available fields and explanations for each field.
Name – This is the name of the payment method.
Description – This description is shown during registration checkout.
Admin-Only Name – This is a name of the payment method that will only be shown in the WP Dashboard (WP-admin).
Admin-Only Description – This description is used only in the WP Dashboard (WP-admin).
Open by Default? – This sets this payment method to be pre-selected on the registration checkout page.
PMD Order – The value (number) can be used to sort or arrange this payment option. A lower value means that it should appear first during registration checkout.
Button URL – This is the URL to the image that will be used during the payment process of registration checkout.
Alternative Button URL: http://ee-screenshots.s3.amazonaws.com/2015/07/invoice-logo.png

Usable From? – Select where this payment method should be available for use. This payment method cannot process payments through the WP-admin (WP Dashboard).
Invoice Display Settings
Payee Name – The [INVOICE_PAYEE_NAME] shortcode is parsed to the value of this field if present, if this field is blank then it’s parsed to the payee name set in the organization settings page, if that page is blank then it parses to an empty string.
Payee Email – The [INVOICE_PAYEE_EMAIL] shortcode is parsed to the value of this field if present, if this field is blank then it’s parsed to the payee email set in the organization settings page, if that page is blank then it parses to an empty string.
Payee Tax Number? – The [INVOICE_PAYEE_TAX_NUMBER_*] shortcode is parsed to the value of this field if present, if this field is blank then it’s parsed to the payee tax number set in the organization settings page, if that page is blank then it parses to an empty string.
Payee Address – The shortcode [INVOICE_PAYEE_ADDRESS] is parsed to the value of this field if present. If this field is empty, then the shortcode will use the value of the company address set in the organization settings page. If that value is empty, then an empty string is used.
Instructions – Provide instructions for how the invoice should be paid.
Logo Image – Upload a logo for your invoice. This will appear in the top left area of the invoice.
Invoice Gateway Settings
Confirmation Text – This text appears on the thank you page after a registration using Invoice as the payment method.
Extra Info – Any extra HTML you may like to include after the confirmation text.
Update Settings – Click this button after making any changes to your payment method.
Deactivate Payment Method – Click this button to deactivate this payment method.
Editing the Invoice Content
The invoice layout and content can be changed through the Messages system in Event Espresso and the following steps are optional.
Go to WP-admin (WP dashboard) –> Event Espresso –> Messages. Then locate the invoice message type. You may need to adjust the pagination to show it on page 1 or click to go to page 2 (located towards the bottom right area of screen). Then click on the recipient for Purchaser. You can then edit the invoice as needed. Be sure to save changes by clicking on the Save button once you are finished.
Usage
The Invoice payment method will let your registrants/attendees be “invoiced” so they can pay later at a specified time.
This is an onsite payment option which means that attendees/registrants will not leave your site. This is a payment method so no actual funds will be transferred via this payment option.
Troubleshooting
I configured Invoice and payments are not being processed. Can you help?
This payment method does not process or transfer actual funds (monies). You’ll need to provide instructions on how an attendee/registrant can pay for their invoice. This can be done by using the Instructions field on the invoice payment method settings.
When I refund a payment, does it also refund a payment automatically?
Refunds in Event Espresso 4 are currently a two step process. First, apply the refund through the transactional details screen of Event Espresso in your WP-admin (WP dashboard). Then process a refund through the payment option that was used. For example, if an attendee/registrant paid via money order, then you would need to refund their payment through a new check or new money order.
The invoice is missing my logo. How do I fix this?
The logo for the invoice is set through the payment methods screen for the Invoice payment method. Be sure to upload an image, select it, and then save changes to the payment method.
How can I setup a recurring payment or subscription through Invoice?
Recurring or subscription payments are not currently supported through the Invoice payment method.
Customizations
- None at this time — check back soon!
https://eventespresso.com/pricing/?ee_ver=ee4
